
Host your AI Language Containers Kubernetes Cluster: Flask Web App Sentiment Analysis with Azure AI Services

Intro
Hello and welcome to another exciting post by CloudBlogger!
In our post today, we’ll explore how to integrate Azure AI Containers into our applications running on Azure Kubernetes Service (AKS). Azure AI Containers enable you to harness the power of Azure’s AI services directly within your AKS environment, giving you complete control over where your data is processed. By streamlining the deployment process and ensuring consistency, Azure AI Containers simplify the integration of cutting-edge AI capabilities into your applications. Whether you’re developing tools for education, enhancing accessibility, or creating innovative user experiences, this guide will show you how to seamlessly incorporate Azure’s AI Containers into your web apps running on AKS.
Why Containers ?
Azure AI services provides several Docker containers that let you use the same APIs that are available in Azure, on-premises. Using these containers gives you the flexibility to bring Azure AI services closer to your data for compliance, security or other operational reasons. Container support is currently available for a subset of Azure AI services.
Azure AI Containers offer:
- Immutable infrastructure: Consistent and reliable system parameters for DevOps teams, with flexibility to adapt and avoid configuration drift.
- Data control: Choose where data is processed, essential for data residency or security requirements.
- Model update control: Flexibility in versioning and updating deployed models.
- Portable architecture: Deploy on Azure, on-premises, or at the edge, with Kubernetes support.
- High throughput/low latency: Scale for demanding workloads by running Azure AI services close to data and logic.
- Scalability: Built on scalable cluster technology like Kubernetes for high availability and adaptable performance.
Source: https://learn.microsoft.com/en-us/azure/ai-services/cognitive-services-container-support
Workshop
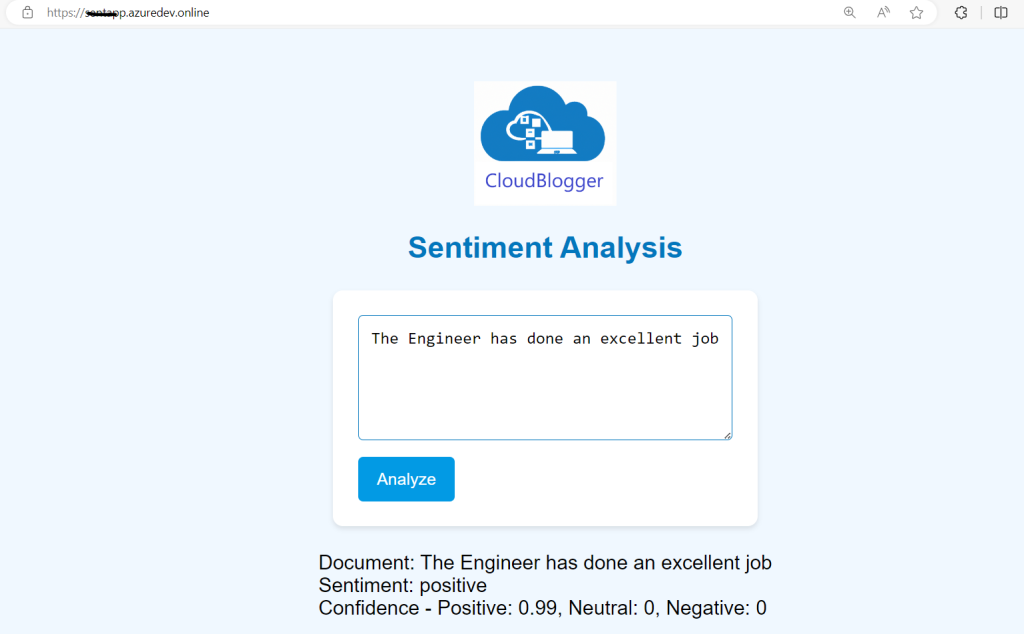
Our Solution will utilize the Azure Language AI Service with the Text Analytics container for Sentiment Analysis. We will build a Python Flask Web App, containerize it with Docker and push it to Azure Container Registry. An AKS Cluster which we will create, will pull the Flask Image along with the Microsoft provided Sentiment Analysis Image directly from mcr.microsoft.com and we will make all required configurations on our AKS Cluster to have an Ingress Controller with SSL Certificate presenting a simple Web UI to write our Text, submit it for analysis and get the results. Our Web UI will look like this:
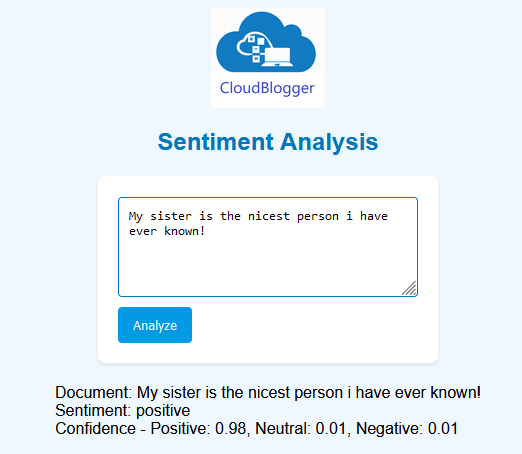
You may recognize this Web UI, it is the same Interface we used for the Durable Functions workshop, and it came quite handy in this case. But we still have to make our Flask integrate with REST API, instead of Python SDK and adjust the code since we don’t need a separate backend. The payload is sent to the Sentiment Analysis service on AKS and the result is presented directly on our UI.
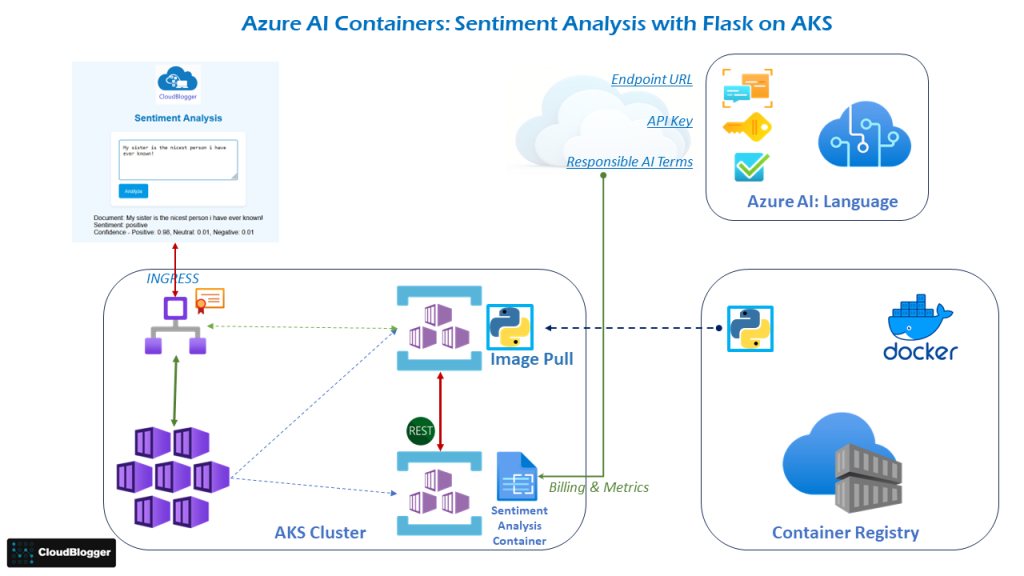
Azure Kubernetes Cluster, Azure Container Registry & Azure Text Analytics
These are our main resources and a Virtual Network of course for the AKS which is deployed automatically. Our Solution is hosted entirely on AKS with a Let’s Encrypt Certificate we will create separately offering secure HTTP with an Ingress Controller serving publicly our Flask UI which is calling via REST the Sentiment Analysis service, also hosted on AKS. The difference is that Flask is build with a custom Docker Image pulled from Azure Container Registry, while the Sentiment Analysis is a Microsoft ready Image which we pull directly.
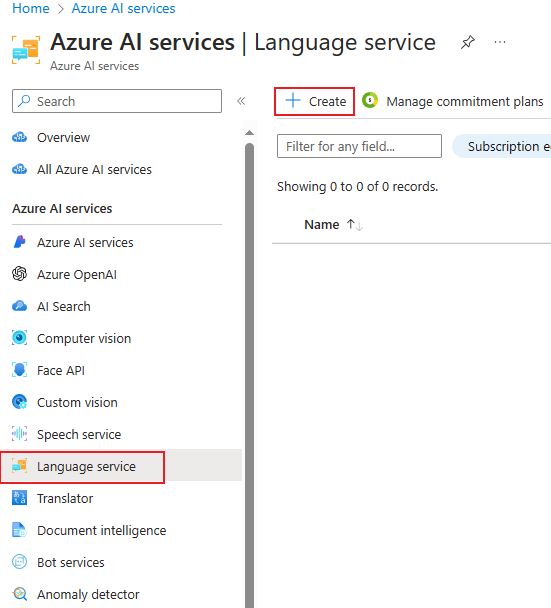
In case your Azure Subscription does not have an AI Service you have to create a Language Service of Text Analytics using the Portal due to the requirement to accept the Responsible AI Terms. For more detail go to https://go.microsoft.com/fwlink/?linkid=2164190 .
Azure Kubernetes
My preference as a best practice, is to create an AKS Cluster with the default System Node Pool and add an additional User Node Pool to deploy my Apps, but it is really a matter of preference at the end of the day. So let’s start deploying! Start from your terminal by logging in with az login and set your Subscription with az account set –subscription ‘YourSubName”
## Change the values in < > with your values and remove < >!
## Create the AKS Cluster
az aks create \
  --resource-group <your-resource-group> \
  --name <your-cluster-name> \
  --node-count 1 \
  --node-vm-size standard_a4_v2 \
  --nodepool-name agentpool \
  --generate-ssh-keys \
  --nodepool-labels nodepooltype=system \
  --no-wait \
  --aks-custom-headers AKSSystemNodePool=true \
  --network-plugin azure

## Add a User Node Pool
az aks nodepool add \
   --resource-group <your-resource-group> \
   --cluster-name <your-cluster-name> \
   --name userpool \
   --node-count 1 \
   --node-vm-size standard_d4s_v3 \
   --no-wait

## Create Azure Container Registry
az acr create \
  --resource-group <your-resource-group> \
  --name <your-acr-name> \
  --sku Standard \
  --location northeurope

## Attach ACR to AKS
az aks update -n <your-cluster-name> -g <your-resource-group> --attach-acr <your-acr-name>
Text Analytics
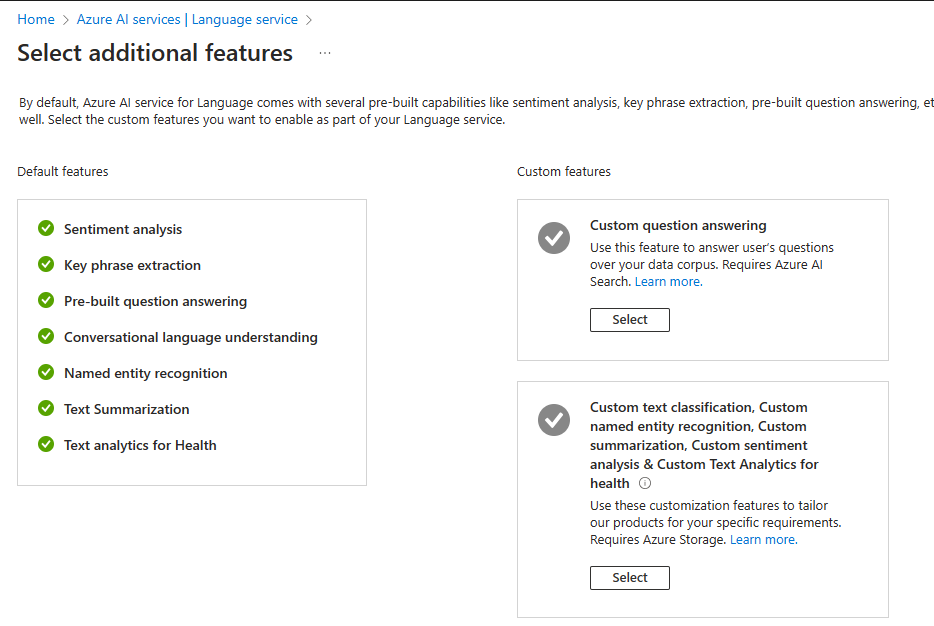
The Language Service is created from the Portal for the reasons we explained earlier. Search for Language and create a new Language service leaving the default selections ( No Custom QnA, no Custom Text Classification) on the F0 (Free) SKU. You may see a VNET menu appear in the Networking Tab, just ignore it, as long as you leave the default Public Access enabled it won’t create a Virtual Network. The presence of the Cloud Resource is for Billing and Metrics.
Flask Web App – Docker Image
A Flask Web App has a directory structure where we store index.html in the Templates directory and our CSS and images in the Static directory. So in essence it looks like this:
-sentiment-aks
  --flaskwebapp
    app.py
    requirements.txt
    Dockerfile
     ---static
          1.style.css
          2.logo.png
     ---templates
          1.index.html
The requirements.txt should have the needed packages :
## requirements.txt
Flask==3.0.0
requests==2.31.0
## index.html
<!DOCTYPE html>
<html>
<head>
<title>Sentiment Analysis App</title>
<link rel="stylesheet" type="text/css" href="{{ url_for('static', filename='style.css') }}">
</head>
<body>
<img src="{{ url_for('static', filename='logo.png') }}" class="icon" alt="App Icon">
<h2>Sentiment Analysis</h2>
<form id="textForm">
<textarea name="text" placeholder="Enter text here..."></textarea>
<button type="submit">Analyze</button>
</form>
<div id="result"></div>
<script>
document.getElementById('textForm').onsubmit = async function(e) {
e.preventDefault();
let formData = new FormData(this);
let response = await fetch('/analyze', {
method: 'POST',
body: formData
});
let resultData = await response.json();
let results = resultData.results;
if (results) {
let displayText = `Document: ${results.document}\nSentiment: ${results.overall_sentiment}\n`;
displayText += `Confidence - Positive: ${results.confidence_positive}, Neutral: ${results.confidence_neutral}, Negative: ${results.confidence_negative}`;
document.getElementById('result').innerText = displayText;
} else {
document.getElementById('result').innerText = 'No results to display';
}
};
</script>
</body>
</html>
## style.css
body {
    font-family: Arial, sans-serif;
    background-color: #f0f8ff; /* Light blue background */
    margin: 0;
    padding: 0;
    display: flex;
    flex-direction: column;
    align-items: center;
    justify-content: center;
    height: 100vh;
}

h2 {
    color: #0277bd; /* Darker blue for headings */
}

.icon {
    height: 100px; /* Adjust the size as needed */
    margin-top: 20px; /* Add some space above the logo */
}

form {
    background-color: white;
    padding: 20px;
    border-radius: 8px;
    width: 300px;
    box-shadow: 0 2px 4px rgba(0, 0, 0, 0.1);
}

textarea {
    width: 100%;
    box-sizing: border-box;
    height: 100px;
    margin-bottom: 10px;
    border: 1px solid #0277bd;
    border-radius: 4px;
    padding: 10px;
}

button {
    background-color: #029ae4; /* Blue button */
    color: white;
    border: none;
    padding: 10px 15px;
    border-radius: 4px;
    cursor: pointer;
}

button:hover {
    background-color: #0277bd;
}

#result {
    margin-top: 20px;
}
And here is the most interesting file, our app.py. Notice the use of a REST API call directly to the Sentiment Analysis endpoint which we will declare in the YAML file for the Kubernetes deployment.
## app.py
from flask import Flask, render_template, request, jsonify
import requests
import os

app = Flask(__name__)

@app.route('/', methods=['GET'])
def index():
    return render_template('index.html')  # HTML file with input form

@app.route('/analyze', methods=['POST'])
def analyze():
    # Extract text from the form submission
    text = request.form['text']
    if not text:
        return jsonify({'error': 'No text provided'}), 400

    # Fetch API endpoint and key from environment variables
    endpoint = os.environ.get("CONTAINER_API_URL")


    # Ensure required configurations are available
    if not endpoint:
        return jsonify({'error': 'API configuration not set'}), 500

    # Construct the full URL for the sentiment analysis API
    url = f"{endpoint}/text/analytics/v3.1/sentiment"
    headers = {
        'Content-Type': 'application/json'
    }
    body = {
        'documents': [{'id': '1', 'language': 'en', 'text': text}]
    }

    # Make the HTTP POST request to the sentiment analysis API
    response = requests.post(url, json=body, headers=headers)
    if response.status_code != 200:
        return jsonify({'error': 'Failed to analyze sentiment'}), response.status_code

    # Process the API response
    data = response.json()
    results = data['documents'][0]
    detailed_results = {
        'document': text,
        'overall_sentiment': results['sentiment'],
        'confidence_positive': results['confidenceScores']['positive'],
        'confidence_neutral': results['confidenceScores']['neutral'],
        'confidence_negative': results['confidenceScores']['negative']
    }

    # Return the detailed results to the client
    return jsonify({'results': detailed_results})

if __name__ == '__main__':
    app.run(host='0.0.0.0', port=5001, debug=False)
And finally we need a Dockerfile, pay attention to have it on the same level as your app.py file.
## Dockerfile
# Use an official Python runtime as a parent image
FROM python:3.10-slim

# Set the working directory in the container
WORKDIR /app

# Copy the current directory contents into the container at /app
COPY . /app

# Install any needed packages specified in requirements.txt
RUN pip install --no-cache-dir -r requirements.txt

# Make port 5001 available to the world outside this container
EXPOSE 5001

# Define environment variable
ENV CONTAINER_API_URL="http://sentiment-service/"

# Run app.py when the container launches
CMD ["python", "app.py"]
Our Web UI is ready to build ! We need Docker running on our development environment and we need to login to Azure Container Registry:
## Login to ACR
az acr login -n <your-acr-name>

## Build and Tag our image
docker build -t <acr-name>.azurecr.io/flaskweb:latest .
docker push <acr-name>.azurecr.io/flaskweb:latest
You can go to the Portal and from Azure Container Registry, Repositories you will find our new Image ready to be pulled!
Kubernetes Deployments
Let’s start deploying our AKS services ! As we already know we can pull the Sentiment Analysis Container from Microsoft directly and that’s what we are going to do with the following tasks. First, we need to login to our AKS Cluster so from Azure Portal head over to your AKS Cluster and click on the Connect link on the menu. Azure will provide the command to connect from our terminal:

Select Azure CLI and just copy-paste the commands to your Terminal.
Now we can run kubectl commands and manage our Cluster and AKS Services.
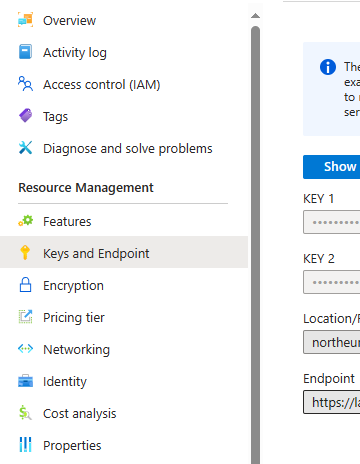
We need a YAML file for each service we are going to build, including the Certificate at the end. For now let’s create the Sentiment Analysis Service, as a Container, with the following file. Pay attention as you need to get the Language Service Key and Endpoint from the Text Analytics resource we created earlier, and in the nodeSelector block we must enter the name of the User Node Pool we created.
apiVersion: apps/v1
kind: Deployment
metadata:
  name: sentiment-deployment
spec:
  replicas: 1
  selector:
    matchLabels:
      app: sentiment
  template:
    metadata:
      labels:
        app: sentiment
    spec:
      containers:
      - name: sentiment
        image: mcr.microsoft.com/azure-cognitive-services/textanalytics/sentiment:latest
        ports:
        - containerPort: 5000
        resources:
          limits:
            memory: "8Gi"
            cpu: "1"
          requests:
            memory: "8Gi"
            cpu: "1"
        env:
        - name: Eula
          value: "accept"
        - name: Billing
          value: "https://<your-Language-Service>.cognitiveservices.azure.com/"
        - name: ApiKey
          value: "xxxxxxxxxxxxxxxxxxxx"
      nodeSelector:
        agentpool: userpool
---
apiVersion: v1
kind: Service
metadata:
  name: sentiment-service
spec:
  selector:
    app: sentiment
  ports:
    - protocol: TCP
      port: 5000
      targetPort: 5000
  type: ClusterIP
Save the file and run from your Terminal:
kubectl apply -f sentiment-deployment.yamlIn a few seconds you can observe the service running from the AKS Services and Ingresses menu.
Let’s continue to bring our Flask Container now. In the same manner create a new YAML:
apiVersion: apps/v1
kind: Deployment
metadata:
  name: flask-service
spec:
  replicas: 1
  selector:
    matchLabels:
      app: flask
  template:
    metadata:
      labels:
        app: flask
    spec:
      containers:
      - name: flask
        image: <your-ACR-name>.azurecr.io/flaskweb:latest
        ports:
        - containerPort: 5001
        env:
        - name: CONTAINER_API_URL
          value: "http://sentiment-service:5000"
        resources:
          requests:
            cpu: "500m"
            memory: "256Mi"
          limits:
            cpu: "1"
            memory: "512Mi"
      nodeSelector:
        agentpool: userpool
---
apiVersion: v1
kind: Service
metadata:
  name: flask-lb
spec:
  type: LoadBalancer
  selector:
    app: flask
  ports:
  - protocol: TCP
    port: 80
    targetPort: 5001
kubectl apply -f flask-service.yamlObserve the Sentiment Analysis Environment Value. It is directly using the Service name of our Sentiment Analysis container as AKS has it’s own DNS resolver for easy communication between services. In fact if we hit the Service Public IP we will have HTTP access to the Web UI.
But let’s see how we can import our Certificate. We won’t describe how to get a Certificate. All we need is the PEM files, meaning the privatekey.pem and the cert.pem. IF we have a PFX we can export them with OpenSSL. Once we have these files in place we will create a secret in AKS that will hold our Certificate key and file. We just need to run this command from within the directory of our PEM files:
kubectl create secret tls flask-app-tls --key privkey.pem --cert cert.pem --namespace defaultOnce we create our Secret we will deploy a Kubernetes Ingress Controller (NGINX is fine) which will manage HTTPS and will point to the Flask Service. Remember to add an A record to your DNS registrar with the DNS Hostname you are going to use and the Public IP, once you see the IP Address:
apiVersion: networking.k8s.io/v1
kind: Ingress
metadata:
  name: flask-app-ingress
spec:
  ingressClassName: webapprouting.kubernetes.azure.com
  tls:
  - hosts:
    - your.host.domain
    secretName: flask-app-tls
  rules:
  - host: your.host.domain
    http:
      paths:
      - path: /
        pathType: Prefix
        backend:
          service:
            name: flask-lb
            port:
              number: 80
kubectl apply -f flask-app-ingress.yamlFrom AKS – Services and Ingresses – Ingresses you will see the assigned Public IP. Add it to your DNS and once the Name Servers are updated you can hit your Hostname using HTTPS!
Final Thoughts
As we’ve explored, the combination of Azure AI Containers and AKS offers a powerful and flexible solution for deploying AI-driven applications in cloud-native environments. By leveraging these technologies, you gain granular control over your data and model deployments, while maintaining the scalability and portability essential for modern applications. Remember, this is just the starting point. As you delve deeper, consider the specific requirements of your project and explore the vast possibilities that Azure AI Containers unlock. Embrace the power of AI within your AKS deployments, and you’ll be well on your way to building innovative, intelligent solutions that redefine what’s possible in the cloud.
Architecture
References
- What are Azure AI Containers ?
- Language Detection to AKS
- CloudBlogger: Sentiment Analysis
- Sentiment Analysis Containers
- Configure Language Service Docker Containers
- Quickstart: Deploy an Azure Kubernetes Service (AKS) cluster using Azure portal