Build your API Endpoints and serve your Web Apps with the power of Container Apps!


Intro
Technology is moving on with amazing features and new applications almost everyday. Containers and Azure Container Apps is the new path of building and deploying Applications with great flexibility, absolute control and security and a wide range of Hosting options. Before the hosting phase, we need a tool to build our Apps and based on the Containers logic we are building micro services which are the components of our app.
One of the most widely used tool is Docker. With Docker we can create a Dockerfile, declare the specifics of our Image, make configurations and finally build that image and push it on our Hosting platform, being Kubernetes, Container Registries or Instances and so on. Azure Container Apps has evolved and we can use a Dockerfile without the need of Docker, so we can build and push our Containers to Azure Container Registry and directly pull the containers to Azure Container Apps managed Environment, making it possible to use one tool for the complete lifecycle of our App Deployment.
Architecture
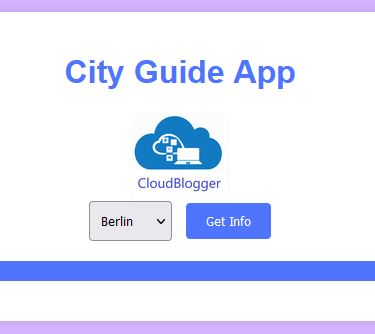
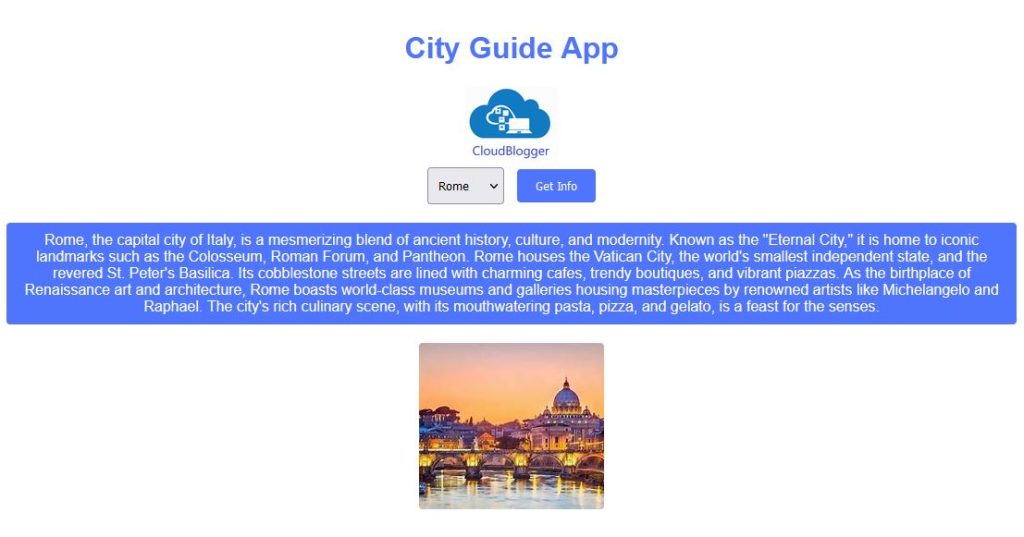
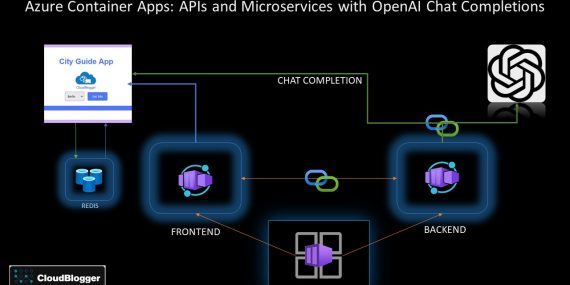
Our Workshop has quite some features to display. We are using a Python Flask Web App as the Frontend and another container image , again in Python as the Backend. The Backend is an API endpoint that controls the process behind the scenes. The idea is simple enough, the Web App allows a user to select a City from a drop-down menu and get some info about the City, as well as a Photo of it. The backend service is responsible for the Photograph fetch, stored on a Storage Account and calling the Open AI Chat Completions API with a controlled prompt to get some general info about that City.
As you may understand this can quickly extend into a fully functional tourist – travel Web App with security, scaling, redundancy and flexibility able to server from a few to a few thousand users. Add also Azure Redis Cache and you have an enterprise scale Application ready for production.
Build
For our resources we are going to use a quite simplistic approach, being Azure CLI.
Before anything create a Storage Account and add a Container with some cities Photos e.x Athens.jpg, Berlin.jpg, Rome.jpg and so on.
Let’s store our variables and run some mandatory commands. Login to Azure and select the subscription you are going to use:
$RESOURCE_GROUP="rg-demoapp"
$LOCATION="westeurope"
$ENVIRONMENT="env-web-1"
$FRONTEND="frontend"
$API_BACKEND="backend"
$ACR_NAME="myrandomnameforacr"

az upgrade
az extension add --name containerapp --upgrade
az provider register --namespace Microsoft.App
az provider register --namespace Microsoft.OperationalInsights
Move on to create a resource group, Azure Redis Cache, Container Apps Environment and an Azure Container Registry:
az group create --name $RESOURCE_GROUP --location "$LOCATION"
az redis create --location "$LOCATION" --name MyRedisCache --resource-group $RESOURCE_GROUP --sku Basic --vm-size c0
az acr create --resource-group $RESOURCE_GROUP --name $ACR_NAME --sku Basic --admin-enabled true
az containerapp env create --name $ENVIRONMENT -g $RESOURCE_GROUP --location "$LOCATION"
Now let’s see our Backend. We are going to deploy our Backend first so the Frontend won’t fail once it is up and running.
from flask import Flask, request, jsonify
from azure.identity import DefaultAzureCredential
from azure.storage.blob import BlobServiceClient
from openai import OpenAI
import os
import redis
import json

app = Flask(__name__)

# Environment variables
OPENAI_API_KEY = os.getenv('OPENAI_API_KEY')
storage_account_name = os.getenv('STORAGE_ACCOUNT_NAME')
container_name = 'cities'

redis_client = redis.Redis(host='xxxxx.redis.cache.windows.net', port=6380, password='xxxxxxxxxxxxxxx', ssl=True)
# Initialize OpenAI with the appropriate API key
client = OpenAI(
  organization='org-xxxxxx',
  api_key=OPENAI_API_KEY  # Use the environment variable here for security
)

# Initialize Azure credentials
credential = DefaultAzureCredential()

# Initialize Azure Blob Service Client with your account name and credential
blob_service_client = BlobServiceClient(account_url=f"https://{storage_account_name}.blob.core.windows.net", credential=credential)

@app.route('/get_city_info', methods=['POST'])
def get_city_info():
    city = request.form['city']

    # Check for cached response
    cached_response = redis_client.get(city)
    if cached_response:
        return jsonify(json.loads(cached_response))

    # Call OpenAI API to get the city description using the Chat model
    response = client.chat.completions.create(
        model="gpt-3.5-turbo",
        messages=[
            {"role": "user", "content": f"Tell me about {city} with 100 words."}
        ]
    )
    print(response.choices[0].message)
    # Extracting the response text from the last message in the conversation
    description = response.choices[0].message.content

    # Get the city image from Azure Blob Storage
    blob_client = blob_service_client.get_blob_client(container=container_name, blob=f'{city}.jpg')
    image_url = blob_client.url
    redis_client.setex(city, 86400, json.dumps({'description': description, 'image_url': image_url}))  # 86400 seconds = 24 hours
    # Return the description and image URL
    return jsonify({
        'description': description,
        'image_url': image_url
    })

if __name__ == '__main__':
    app.run(debug=True)
Create a Dockerfile as usual:
# Use an official Python runtime as a parent image
FROM python:3.11-bullseye

# Set the working directory in the container
WORKDIR /app

# Copy the current directory contents into the container at /app
COPY . /app

# Install any needed packages specified in requirements.txt
RUN pip install --no-cache-dir -r requirements.txt

# Make port 5000 available to the world outside this container
EXPOSE 5000

# Define environment variable
ENV FLASK_APP=app.py
ENV FLASK_RUN_HOST=0.0.0.0
# Optionally, if you want to run in production mode
# ENV FLASK_ENV=production

# Run app.py when the container launches
CMD ["flask", "run"]
Now the twist. We can build directly into Azure Container Registry, and create our Container App so:
az acr build --registry $ACR_NAME --image backend .

az containerapp create --name $API_NAME --resource-group $RESOURCE_GROUP --environment $ENVIRONMENT --image $ACR_NAME.azurecr.io/$API_NAME --target-port 5000 --env-vars STORAGE_ACCOUNT_NAME=xxxxxx OPENAI_API_KEY=sxxxx --ingress 'external' --registry-server $ACR_NAME.azurecr.io --query properties.configuration.ingress.fqdn

## Get the URL of the API Endpoint:
$API_BASE_URL=(az containerapp show --resource-group $RESOURCE_GROUP --name $API_NAME --query properties.configuration.ingress.fqdn -o tsv)
Great ! Now all we need is a Flask (or any other Web App), to post our page and allow users to select a City from a drop-down menu. The index file needs an AJAX method to display the Data coming as response, and i am going to upload it to GitHub along with the code.
from flask import Flask, render_template, request, jsonify
import os
import requests

app = Flask(__name__)

storage_account_name = os.getenv('STORAGE_ACCOUNT_NAME')
backend_api_url = os.getenv('BACKEND_API_URL')

@app.route('/')
def index():
    # Just render the initial form
    return render_template('index.html')

@app.route('/get_city_info', methods=['POST'])
def get_city_info():
    city = request.form.get('city')

    # Call the backend service using form data
    response = requests.post(f"{backend_api_url}/get_city_info", data={"city": city})
    if response.status_code == 200:
        data = response.json()
        description = data.get('description', "No description available")
        image_url = data.get('image_url', f"https://{storage_account_name}.blob.core.windows.net/cities/{city}.jpg")
    else:
        # Fallback in case of an error
        description = "Error fetching data"
        image_url = f"https://{storage_account_name}.blob.core.windows.net/cities/{city}.jpg"

    # The AJAX call expects a JSON response
    return jsonify(description=description, image_url=image_url)

if __name__ == '__main__':
    app.run(debug=False)
Same manner create a Dockerfile:
# Use an official Python runtime as a parent image
FROM python:3.11-bullseye

# Set the working directory in the container
WORKDIR /app

# Copy the current directory contents into the container at /usr/src/app
COPY . /app

# Install any needed packages specified in requirements.txt
RUN pip install --no-cache-dir -r requirements.txt

# Make port 8000 available to the world outside this container
EXPOSE 8000

# Define environment variable
# ENV NAME World

# Run app.py when the container launches
CMD ["gunicorn", "-b", "0.0.0.0:8000", "app:app"]
And build our Frontend and create the Container App:
az acr build --registry $ACR_NAME --image frontend .
az containerapp create --name $FRONTEND --resource-group $RESOURCE_GROUP --environment $ENVIRONMENT --image $ACR_NAME.azurecr.io/frontend  --target-port 8000 --env-vars BACKEND_API_URL=https://$BACKEND_API_URL STORAGE_ACCOUNT_NAME=xxxxxx --ingress 'external' --registry-server $ACR_NAME.azurecr.io --query properties.configuration.ingress.fqdn
You will be presented with the URL that the Frontend is serving the Web page. Of course we can attach a custom domain, and our own SSL , but we can always make our tests and check our deployment.

Make some tests, and watch how Redis Cache brings the results immediately back, while new selected Cities need a second or two to bring back the response and the Blob Image.

Our Architecture looks like this, a simple deployment with a powerful underlying Service, Azure Container Apps!

Closing
In a few steps we deployed our Web Application utilizing Azure Container Apps, the latest technology for Applications, using Containers for our Images build with the standard Dockerfile, but deployed directly to Azure Container Registry and then to Container Apps. We showcased how we can build our own API endpoints and call other APIs and also the use of Redis Cache for Caching and faster data retrieval.
The Solution can expand, adding Private Connectivity , Custom Domains and Firewalls, Authentication and Key Vault as well. We will probably do that in another CloudBlogger session in 2024!
