How to create intelligent Bots with the Bot Framework

Intro
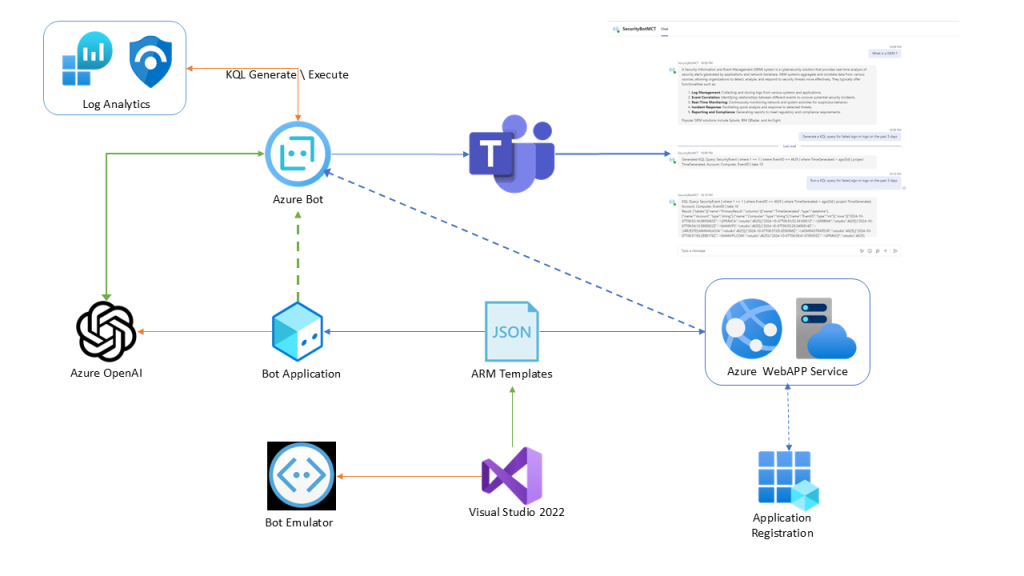
In an era where cybersecurity threats loom large, the need for vigilant and responsive security measures has never been greater. The Microsoft Bot Framework SDK, with its powerful AI capabilities, offers a new frontier in security management. This blog post will delve into the development of such an AI security assistant, showcasing how to leverage the SDK to interpret security logs, generate KQL queries, and provide real-time security alerts. We’ll explore how to integrate with existing security infrastructure and harness the power of AI to build our own AI Security Assistant. Join us as we explore this exciting intersection of AI and cybersecurity, where intelligent bots stand guard against the ever-evolving landscape of digital threats.
Setup
Before we start with the Bot Framework SDK, we need to prepare our development environment. This section will guide you through the necessary steps to set up your “canvas” and get started with building your AI-powered writing assistant.
Prerequisites:
- Visual Studio: Ensure you have Visual Studio installed with the .NET desktop development workload. You can download it from the official Microsoft website.
- Azure Subscription: An active Azure subscription is required to access the Copilot SDK and its related services. If you don’t have one already, you can sign up for a free trial.
- Bot Framework Emulator: This tool allows you to test your bot locally before deploying it to Azure. Download it from the Bot Framework website.
Creating a New Bot Project:
- Install the Bot Framework SDK: Open Visual Studio and create a new project. Choose the “Echo Bot (Bot Framework v4)” template. This template provides a basic bot structure to get you started quickly.
- Install the required NuGet Packages:
- Azure.AI.OpenAI
- Azure.Core
- Microsoft.Bot.Builder.Integration.AspNet.Core
- Configure Your Bot: In the
appsettings.jsonfile, you’ll need to configure your bot with the appropriate API keys and endpoints for the Copilot service. You can obtain these credentials from your Azure portal.
{
  "MicrosoftAppType": "xxxxxx", // Leave it empty until publish
  "MicrosoftAppId": "xxxx", // Leave it empty until publish
  "MicrosoftAppPassword": "xxxx", // Leave it empty until publish
  "MicrosoftAppTenantId": "xxxxxx", // Leave it empty until publish
  "AzureOpenAI": {
    "ApiKey": "xxxxxxxxxx",
    "DeploymentName": "gpt-4o",
    "Endpoint": "https://xxxx.openai.azure.com"
  },
  "AzureSentinel": { // Log Analytics
    "ClientId": "xxxx",
    "ClientSecret": "xxxxx",
    "TenantId": "xxxx",
    "WorkspaceId": "xxxxx"
  }
}
When you open the Echo Bot we need to make changes to our code in order to achieve 3 things:
- Azure OpenAI Chat Interaction and generic advice
- KQL Query generation
- KQL Query execution against a Sentinel Workspace \ Log Analytics
The main program is EchoBot.cs (you can rename as needed).
using Microsoft.Bot.Builder;
using Microsoft.Bot.Schema;
using Newtonsoft.Json;
using System.Net.Http;
using System.Text;
using System.Threading;
using System.Threading.Tasks;
using Microsoft.Extensions.Configuration;
using Azure.AI.OpenAI;
using Azure;
using System.Collections.Generic;
using System.Linq;
using System;
using System.Text.RegularExpressions;

namespace SecurityBot.Bots
{
    public class Security : ActivityHandler
    {
        private readonly HttpClient _httpClient;
        private readonly AzureOpenAIClient _azureClient;
        private readonly string _chatDeployment;
        private readonly IConfiguration _configuration;
        private Dictionary<string, int> eventMapping; // Declare eventMapping here

        public Security(IConfiguration configuration)
        {
            _configuration = configuration ?? throw new ArgumentNullException(nameof(configuration));
            _httpClient = new HttpClient();

            // Load event mappings from JSON file
            string eventMappingPath = Path.Combine(AppContext.BaseDirectory, "eventMappings.json");
            if (File.Exists(eventMappingPath))
            {
                var json = File.ReadAllText(eventMappingPath);
                eventMapping = JsonConvert.DeserializeObject<Dictionary<string, int>>(json);
            }

            // Azure OpenAI Chat API configuration
            var endpoint = configuration["AzureOpenAI:Endpoint"];
            var apiKey = configuration["AzureOpenAI:ApiKey"];
            _chatDeployment = configuration["AzureOpenAI:DeploymentName"]; // Your Chat model deployment name

            // Initialize the Azure OpenAI client
            _azureClient = new AzureOpenAIClient(new Uri(endpoint), new AzureKeyCredential(apiKey));
        }

        protected override async Task OnMessageActivityAsync(ITurnContext<IMessageActivity> turnContext, CancellationToken cancellationToken)
        {
            var userInput = turnContext.Activity.Text.ToLower();

            // Detect if the user wants to generate a query
            if (userInput.Contains("generate"))
            {
                // If the user says "generate", extract event and date, then generate the query
                var kqlQuery = await BuildKQLQueryFromInput(userInput, turnContext, cancellationToken);
                await turnContext.SendActivityAsync(MessageFactory.Text($"Generated KQL Query: {kqlQuery}"), cancellationToken);
            }
            else if (userInput.Contains("run"))
            {
                // If the user says "run", extract event and date, then run the query
                var kqlQuery = await BuildKQLQueryFromInput(userInput, turnContext, cancellationToken);
                var queryResult = await RunKqlQueryAsync(kqlQuery);
                await turnContext.SendActivityAsync(MessageFactory.Text($"KQL Query: {kqlQuery}\n\nResult: {queryResult}"), cancellationToken);
            }
            else
            {
                // For other inputs, handle the conversation with Azure OpenAI
                await GenerateChatResponseAsync(turnContext, userInput, cancellationToken);
            }
        }

        // Generate responses using the Azure OpenAI Chat API without streaming
        private async Task GenerateChatResponseAsync(ITurnContext<IMessageActivity> turnContext, string userInput, CancellationToken cancellationToken)
        {
            var chatClient = _azureClient.GetChatClient(_chatDeployment);

            // Set up the chat conversation context
            var chatMessages = new List<ChatMessage>
            {
                new SystemChatMessage("You are a cybersecurity assistant responding only to Security related questions. For irrelevant topics answer with 'Irrelevant'"),
                new UserChatMessage(userInput)
            };

            // Call the Azure OpenAI API to get the complete chat response
            var chatResponse = await chatClient.CompleteChatAsync(chatMessages);

            // Access the completion content properly
            var assistantMessage = chatResponse.Value.Content.FirstOrDefault()?.Text;

            if (!string.IsNullOrEmpty(assistantMessage))
            {
                // Send the entire response to the user at once
                await turnContext.SendActivityAsync(MessageFactory.Text(assistantMessage.ToString().Trim()), cancellationToken);
            }
            else
            {
                await turnContext.SendActivityAsync(MessageFactory.Text("I'm sorry, I couldn't process your request."), cancellationToken);
            }
        }

        // Build a KQL query from the user's input using Text Analytics
        private async Task<string> BuildKQLQueryFromInput(string input, ITurnContext<IMessageActivity> turnContext, CancellationToken cancellationToken)
        {
            // Start with a base KQL query
            string kqlQuery = "SecurityEvent | where 1 == 1 ";

            // Use the eventMapping dictionary to map the user's input to an EventID
            var matchedEventId = eventMapping.FirstOrDefault(mapping => input.Contains(mapping.Key)).Value;

            if (matchedEventId != 0) // EventID was found
            {
                kqlQuery += $"| where EventID == {matchedEventId} ";
            }
            else
            {
                // Fallback if no matching EventID is found
                await turnContext.SendActivityAsync(MessageFactory.Text("Sorry, I couldn't find a matching event ID for your request."), cancellationToken);
                return null; // Exit early if no valid EventID is found
            }

            // Extract the DateRange (e.g., "7 days") and add it to the query
            var dateRange = ExtractDateRange(input);
            if (!string.IsNullOrEmpty(dateRange))
            {
                kqlQuery += $"| where TimeGenerated > ago({dateRange}) | project TimeGenerated, Account, Computer, EventID | take 10 ";
            }

            return kqlQuery;  // Return the constructed KQL query
        }

        private string ExtractDateRange(string input)
        {
            // Simple extraction logic to detect "7 days", "3 days", etc.
            var match = Regex.Match(input, @"(\d+)\s+days?");
            if (match.Success)
            {
                return $"{match.Groups[1].Value}d";  // Return as "7d", "3d", etc.
            }
            return null;  // Return null if no date range found
        }

        // Run KQL query in Azure Sentinel / Log Analytics
        private async Task<string> RunKqlQueryAsync(string kqlQuery)
        {
            var _workspaceId = _configuration["AzureSentinel:WorkspaceId"];
            string queryUrl = $"https://api.loganalytics.io/v1/workspaces/{_workspaceId}/query";
            var accessToken = await GetAccessTokenAsync();  // Get Azure AD token

            var requestBody = new
            {
                query = kqlQuery
            };

            var jsonContent = new StringContent(JsonConvert.SerializeObject(requestBody), Encoding.UTF8, "application/json");

            _httpClient.DefaultRequestHeaders.Clear();
            _httpClient.DefaultRequestHeaders.Add("Authorization", $"Bearer {accessToken}");

            var response = await _httpClient.PostAsync(queryUrl, jsonContent);
            var responseBody = await response.Content.ReadAsStringAsync();

            return responseBody;  // Return the query result
        }

        // Get Azure AD token for querying Log Analytics
        private async Task<string> GetAccessTokenAsync()
        {
            var _tenantId = _configuration["AzureSentinel:TenantId"];
            var _clientId = _configuration["AzureSentinel:ClientId"];
            var _clientSecret = _configuration["AzureSentinel:ClientSecret"];
            var url = $"https://login.microsoftonline.com/{_tenantId}/oauth2/v2.0/token";
            var body = new Dictionary<string, string>
            {
                { "grant_type", "client_credentials" },
                { "client_id", _clientId },
                { "client_secret", _clientSecret },
                { "scope", "https://api.loganalytics.io/.default" }
            };

            var content = new FormUrlEncodedContent(body);
            var response = await _httpClient.PostAsync(url, content);
            var responseBody = await response.Content.ReadAsStringAsync();
            dynamic result = JsonConvert.DeserializeObject(responseBody);

            return result.access_token;
        }
    }
}
Event ID Mapping
Let’s map most important Event ids to utterances. The Solution can be enhanced with Text Analytics and NLU, but for this workshop we are creating the dictionary.
{
  "failed sign-in": 4625,
  "successful sign-in": 4624,
  "account lockout": 4740,
  "password change": 4723,
  "account creation": 4720,
  "logon type": 4624,
  "registry value was modified": 4657,
  "user account was changed": 4738,
  "user account was enabled": 4722,
  "user account was disabled": 4725,
  "user account was deleted": 4726,
  "user account was undeleted": 4743,
  "user account was locked out": 4767,
  "user account was unlocked": 4768,
  "user account was created": 4720,
  "attempt was made to duplicate a handle to an object": 4690,
  "indirect access to an object was requested": 4691,
  "backup of data protection master key was attempted": 4692,
  "recovery of data protection master key was attempted": 4693,
  "protection of auditable protected data was attempted": 4694,
  "unprotection of auditable protected data was attempted": 4695,
  "a primary token was assigned to process": 4696,
  "a service was installed in the system": 4697,
  "a scheduled task was created": 4698,
  "a scheduled task was deleted": 4699,
  "a scheduled task was enabled": 4700,
  "a scheduled task was disabled": 4701,
  "a scheduled task was updated": 4702,
  "a token right was adjusted": 4703,
  "a user right was assigned": 4704,
  "a user right was removed": 4705,
  "a new trust was created to a domain": 4706,
  "a trust to a domain was removed": 4707,
  "IPsec Services was started": 4709,
  "IPsec Services was disabled": 4710
}
Make all required updates to Program.cs and Startup.cs for the Namespace and the public class.
// Generated with Bot Builder V4 SDK Template for Visual Studio EchoBot v4.22.0

using Microsoft.AspNetCore.Hosting;
using Microsoft.Extensions.Hosting;

namespace SecurityBot
{
    public class Program
    {
        public static void Main(string[] args)
        {
            CreateHostBuilder(args).Build().Run();
        }

        public static IHostBuilder CreateHostBuilder(string[] args) =>
            Host.CreateDefaultBuilder(args)
                .ConfigureWebHostDefaults(webBuilder =>
                {
                    webBuilder.UseStartup<Startup>();
                });
    }
}
Testing
Run the Application and open the Azure Bot Emulator to test the Bot. All you need is to add the localhost URL to the Emulator and make some Chat interactions for example:
- What is a SOAR ? Using OpenAI Chat
- Generate a KQL query for failed sign-in logs on the past 3 days
- Run a KQL query for failed sign-in logs on the past 3 days
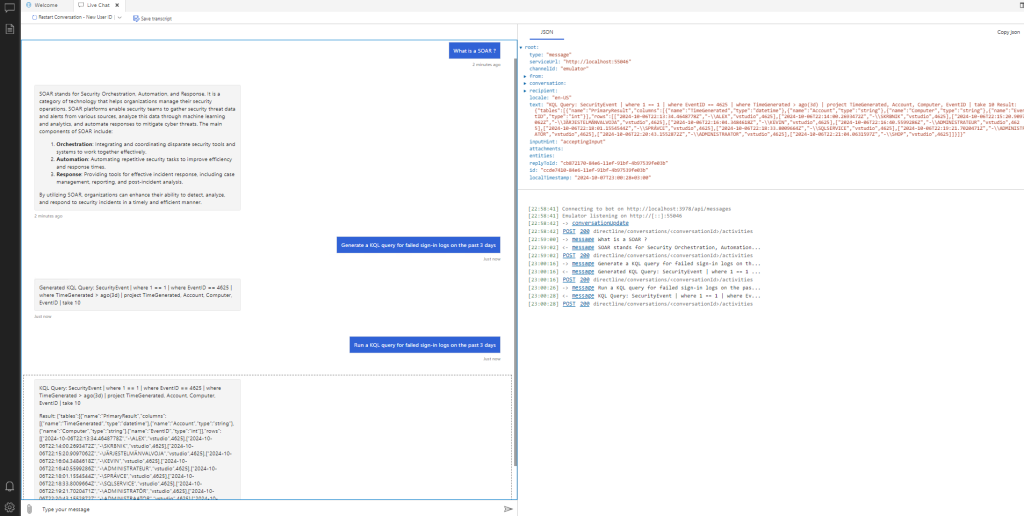
We have correct executions and KQL against our Sentinel\Log Analytics workspace. Let’s build this Bot on Azure and use it from our Teams Client as our Trusted Security Assistant !
Build on Azure
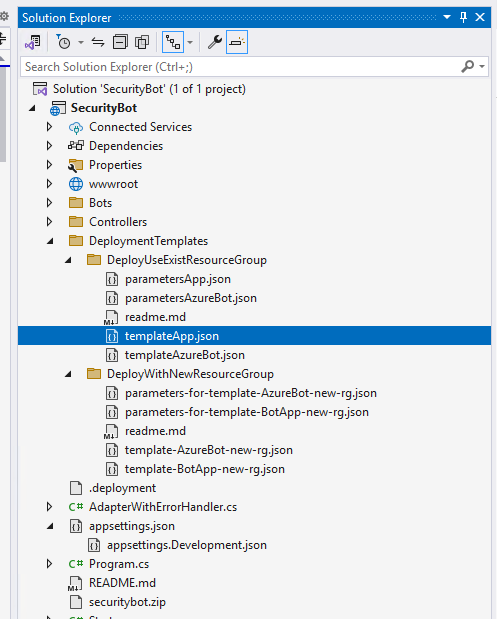
The logic behind a Bot build on Azure is to create an Azure Web App and then the relevant Azure Bot Service. All the steps are published in Microsoft Documentation.
You will find the ARM Templates on the Solution Window in Visual Studio 2022:
Use the following commands to create your app registration and set its password. On success, these commands generate JSON output.
- Use the
az ad app createcommand to create an Microsoft Entra ID app registration. - This command generates an app ID that you’ll use in the next step.
- az ad app create –display-name “<app-registration-display-name>” –sign-in-audience “AzureADMyOrg”
- Use
AzureADMyOrgfor a single tenant app. - Use the
az ad app credential resetcommand to generate a new password for your app registration.ad app credential reset --id "<appId>" - Record values you’ll need in later steps: the app ID and password from the command output.
Once you have the App Registration ready and configured deploy the Web App on Azure using the deployment Templates.
Create the App Service and the Azure Bot resources for your bot. Both steps use an ARM template and the az deployment group create Azure CLI command to create the resource or resources.
- Create an App Service resource for your bot. The App service can be within a new or existing App Service Plan.For detailed steps, see Use Azure CLI to create an App Service.
- Create an Azure Bot resource for your bot.For detailed steps, see Use Azure CLI to create or update an Azure Bot.
az deployment group create –resource-group <resource-group> –template-file <template-file-path> –parameters “@<parameters-file-path>”
Now time to build and Publish the Bot, make sure you have run the Bot resource ARM deployment as we did with the Web App
Create the deployment file for the Bot:
- Switch to your project’s root folder. For C#, the root is the folder that contains the .csproj file.
- Do a clean rebuild in release mode.
- If you haven’t done so before, run
az bot prepare-deployto add required files to the root of your local source code directory. This command generates a.deploymentfile in your bot project folder. - Within your project’s root folder, create a zip file that contains all files and sub-folders.
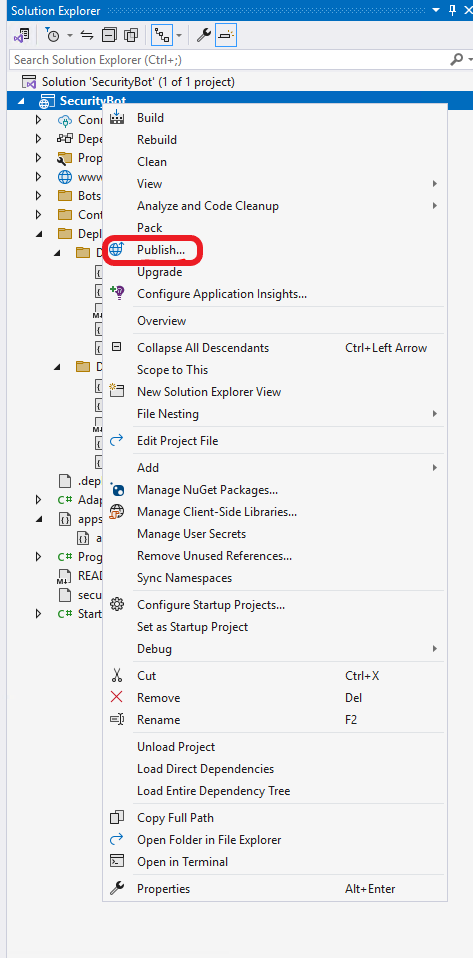
I suggest after this to run either: Run the az webapp deploy command from the command line to perform deployment using the Kudu zip push deployment for your app service (web app).
Or select the Publish option from the Solution Explorer and Publish using the created Web App
Remember to add the App ID and the relevant details to appsettings.json we saw earlier. In case you need to re test with the Emulator, remove the App Type, the App ID , Password and Tenant ID settings before running the App locally!
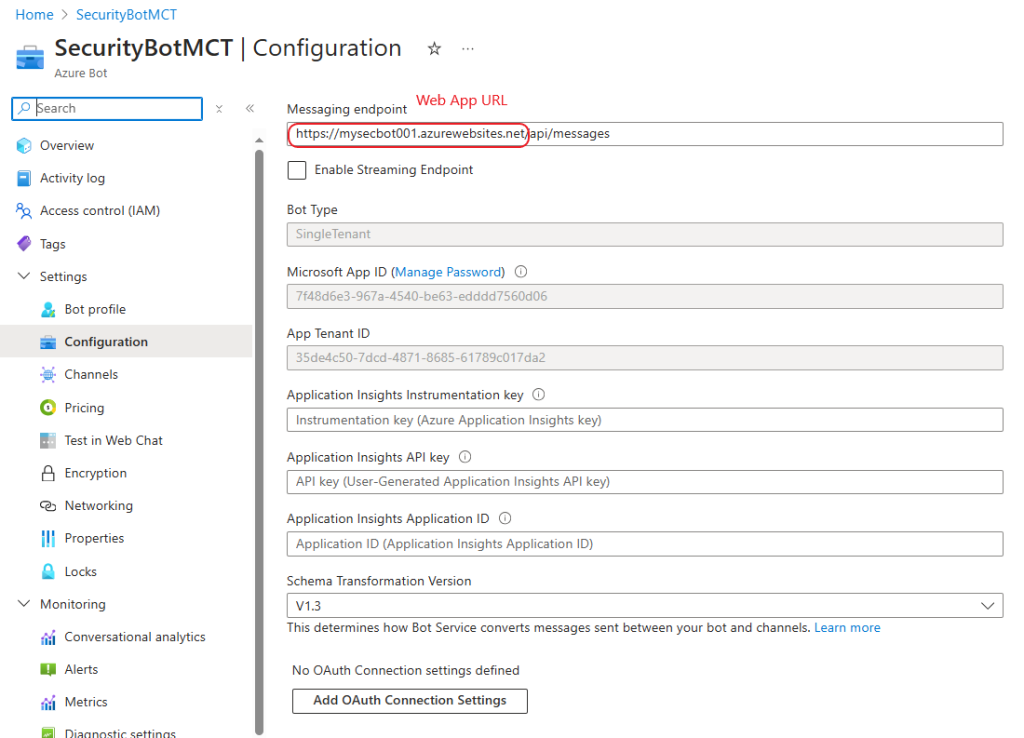
Upon success make sure the Bot Messaging Endpoint has the Web App URL we created, followed by the /api/messages suffix. In case it is missing add it:
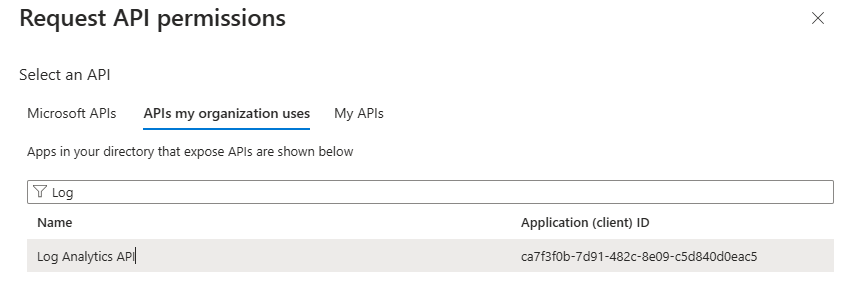
Now we must add the correct API Permissions to the App registration in Entra ID. Select the App Registration, go to API Permissions, add permission and select API My Organization uses. Find the Log analytics and add the Application Permissions for Read:
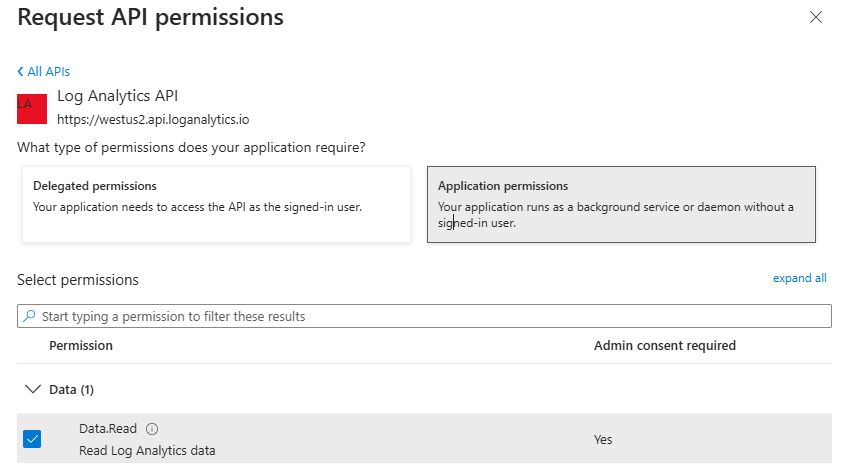
This way we are able to run\execute KQL against our Sentinel – Log Analytics Workspace.
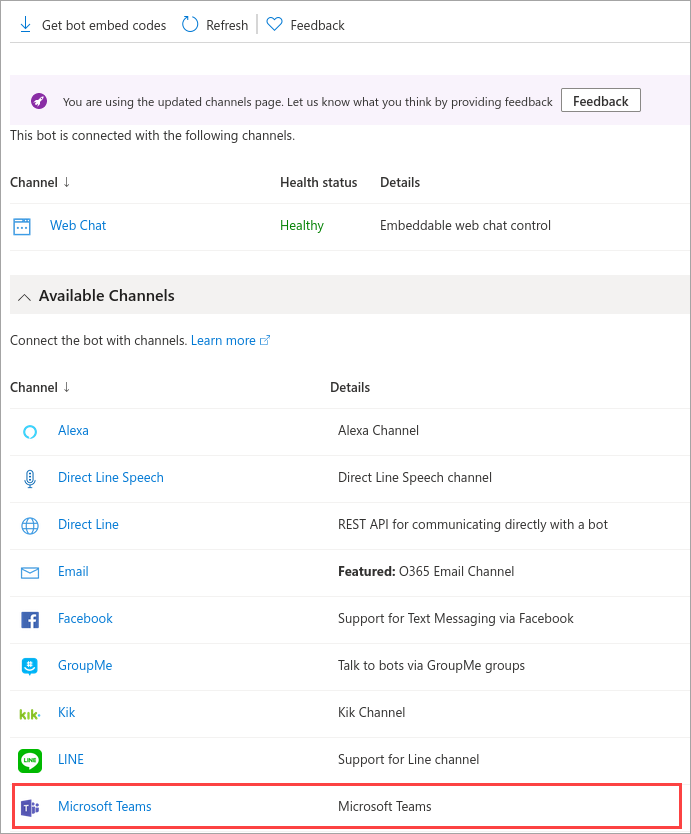
Bot Channels – Teams
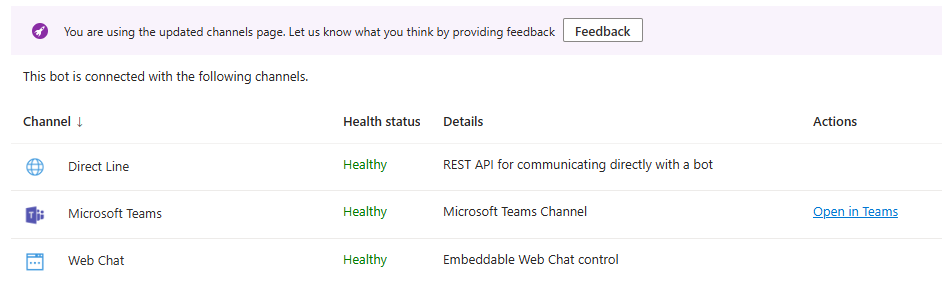
Now that our Bot is active and we can Test in “Test in Web Chat”, we can create the Teams Integration. It is really a simple step, where we select the Teams option from the Channels and verify the configuration.
Once we enable that, we can get the HTTPS code from the Get Embed option in the Channels Menu, or open he URL Directly when we select the Teams Channel:
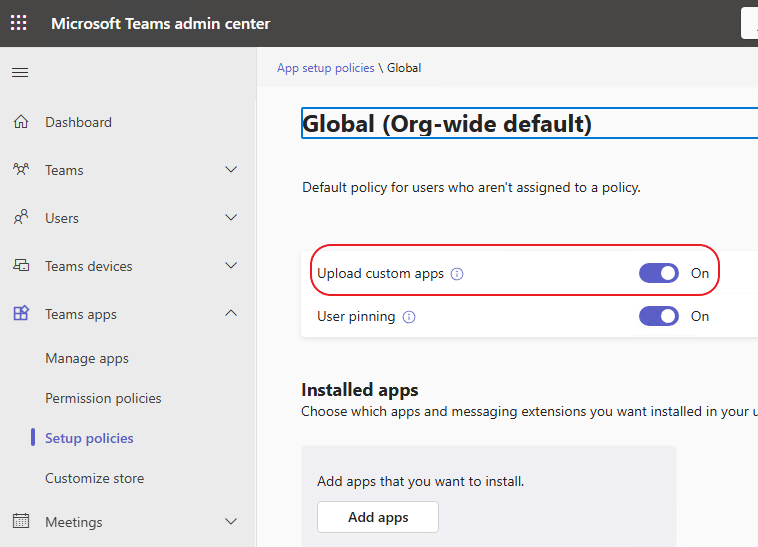
Before we start using the Bot we must make a significant configuration in Teams Admin Center. Otherwise the Bot will probably show-up but unable to get messages from the Chat.
Bot in Teams
Finally we are able to use our Security Assistant Bot in Teams, Web or Desktop App. The Bot will provide generic advice from Azure OpenAI Chat model, will generate KQL queries for a number of Events and execute those Queries in Log Analytics and we will see the results in our UI.
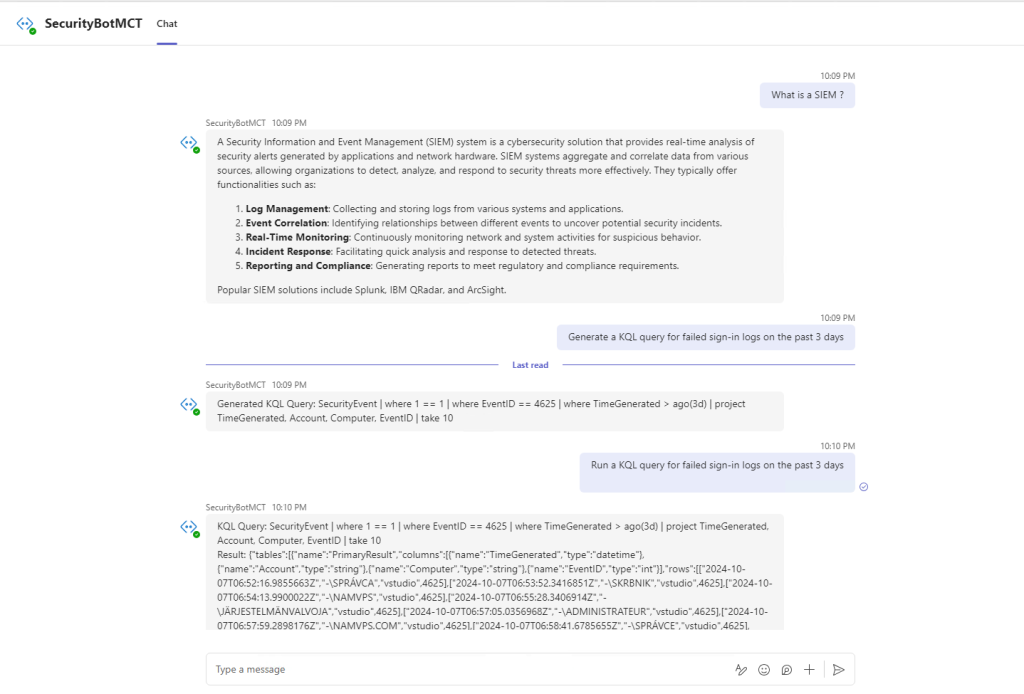
We can always change the appearance of the results, in this workshop we have minimal presentation for better visibility. The next phase of this Deployment can utilize Language Service where all Event IDs are dynamically recognized through a Text Analytics service.
Conclusion
In conclusion, this workshop demonstrated the seamless integration of Azure’s powerful AI services and Log Analytics to build a smart, security-focused chatbot. By leveraging tools like Azure OpenAI, Log Analytics, and the Bot Framework, we’ve empowered bots to provide dynamic insights and interact meaningfully with data. Whether it’s querying log events or responding to security inquiries, this solution highlights the potential of AI-driven assistants to elevate security operations. Keep exploring and building with Azure, and unlock new possibilities in automation and intelligence!